Event Storming with Specifications by Example

Event Storming is a technique defined and refined by Alberto Brandolini (@ziobrando). I fully agree the statement about this method, Event Storming is for now “The smartest approach to collaboration beyond silo boundaries”

I don’t want to explain what Event Storming is, the concept is present in the IT world for a few years already and there are a lot of articles or videos explaining the basics. What I want to emphasize is WHY do we need to learn and apply this technique:
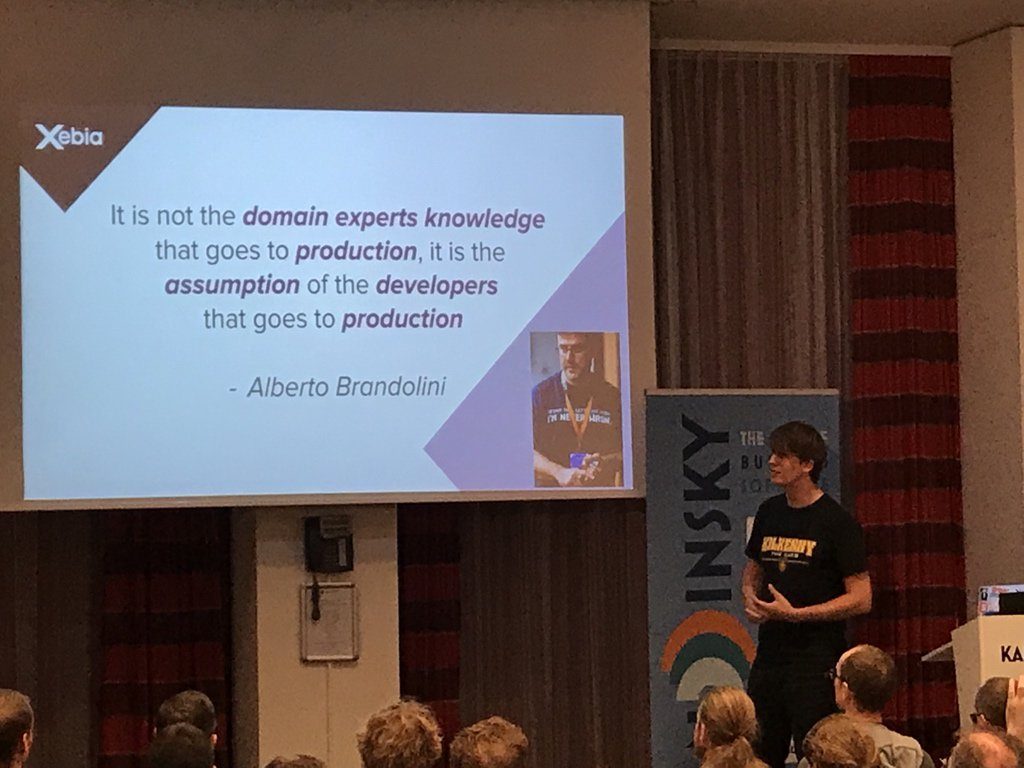
The knowledge of the product experts may differ from the assumption of the developers
KanDDDinsky 2018 – Kenny Baas-Schwegler

On the 18-19.10.2018 I had the opportunity to not only hear a great talk about Event Storming but also to be part of a 2 hours long hands-on session, all this powered by Kandddinsky (for me the best conference I visited this year) and by @kenny_baas (and @use case driven and @brunoboucard). In the last few years I participated on a few Event Storming sessions, mostly on community events, twice at cleverbridge but this time it was different. Maybe ES is like Unit Testing, you have to exercise and reflect about what went well and what must be improved. Anyway this time I learned and observed a few rules and principles new for me and their effects on the outcome. This is what I want to share here.

  1. You need a facilitator.
    Both ES sessions I was part at cleverbridge have ended with frustration. All participants were willing to try it out but we had nobody to keep the chaos under control. Because as Kenny said “There will be chaos, this is guaranteed.” But this is OK, we – devs, product owners, sales people, etc. – have to learn fast to understand each other without learning the job of the “other party” or writing a glossary (I tried that already and didn’t helped 😐 ). Also we need somebody being able to feel and steer the dynamics in the room.


    The tweets were written during a discussion about who could be a good facilitator. You can read the whole thread on Twitter if you like. Another good article summarizing the first impressions of @mathiasverraes as facilitator is this one.

  2. Explain AND visualize the rules beforehand.
    I skip for now the basics like the necessity of a very long free wall and that the events should visualize the business process evolving in time.
    This are the additional rules I learned in the hands-on session:

      1. no dev-talk! The developer is per se a species able to transform EVERYTHING in patterns and techniques and tables and columns and this ability is not helpful if one wants to know if we can solve a problem together. By using dev-speech the discussion will be driven to the technical “solvability” based on the current technical constraints like architecture. With ES we want to create or deepen our ubiquitous language , and this surely not includes the word “Message Bus”  😉
      2. Every discussion should happen on the board. There will be a lot of discussions and we tend to talk a lot about opinions and feelings. This won’t happen if we keep discussing about the business processes and events which are visualized in front of us – on the board.
      3. No discussions regarding persons not in the room. Discussing about what we think other people would mind are not productive and cannot lead to real results. Do not waste time with it, time is too short anyway.
      4. Open questions occurring during the storming should not be discussed (see the point above) but marked prominently with a red sticky. Do not waste time
      5. Do not discuss about everything, look for the money! The most important goal is to generate benefit and not to create the most beautiful design!

Tips for the Storming:

  • “one person, one sharpie, one set of stickies”: everybody has important things to say, nobody should stay away from the board and the discussions.
  • start with describing the business process, business rules, eventual consistent business decisions aka policies, other constraints you – or the product owner whom the business “belongs” – would like to model, and write the most important information somewhere visible for everybody.
  • explain how ES works: every business relevant event should be placed on a time line and should be formulated in the past tense. Business relevant is everything somebody (Kibana is not a person, sorry 😉 ) would like know about.
  • explain the rules and the legend (you need a color legend to be able to read the results later).
  • give the participants time (we had 15 minutes) to write every business event they think it is important to know about on orange stickies. Also write the business rules (the wide dark red ones) and the product decisions (the wide pink ones) on stickies and put them there where they are applied. The rules before the event, the policies after one event happened.
  • start putting the stickies on the wall, throw away the duplicates, discuss and maybe reformulate the rest. After you are done try to tell the story based on what you can read on the wand. After this read the stickies from the end to the start. With these methods you should be able to discover if you have gaps or used wrong assumptions by modelling the process you wanted to describe.
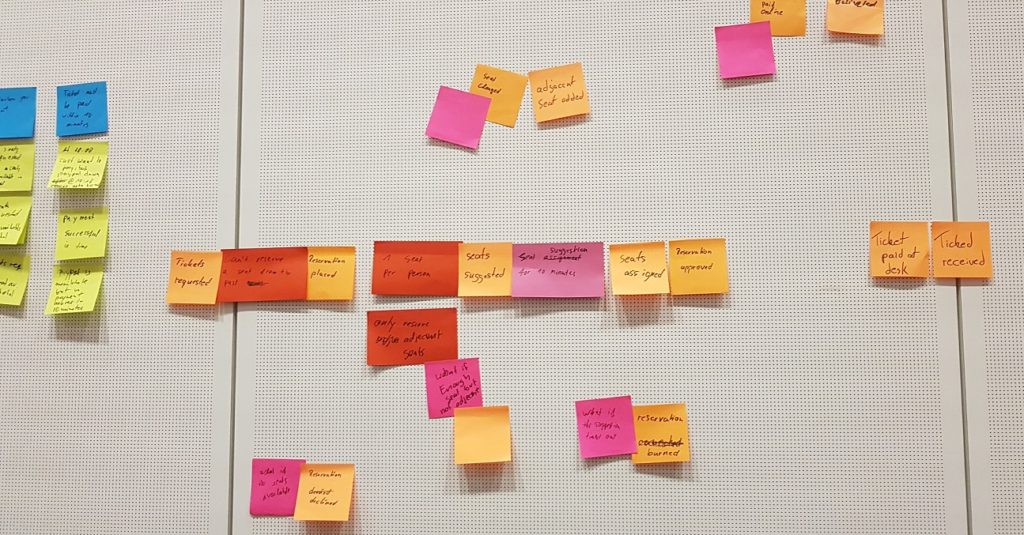
  • mark known processes (like “manual process”) with the same stickies as the policies and do not waste time discussing it further.
  • start to discuss the open questions. Almost always there are different ways to answer this questions and if you cannot decide in a few seconds than postpone it. But as default: decide to create the event and measure how often happens so that later on you can make the right decision!
    Event Storming – measure now, decide later


    Another good article for this topic is this one from @thinkb4coding

At this point we could have continued with the process to find aggregates and bounded contexts but we didn’t. Instead we switched the methodology to Specifications by Example – in my opinion a really good idea!
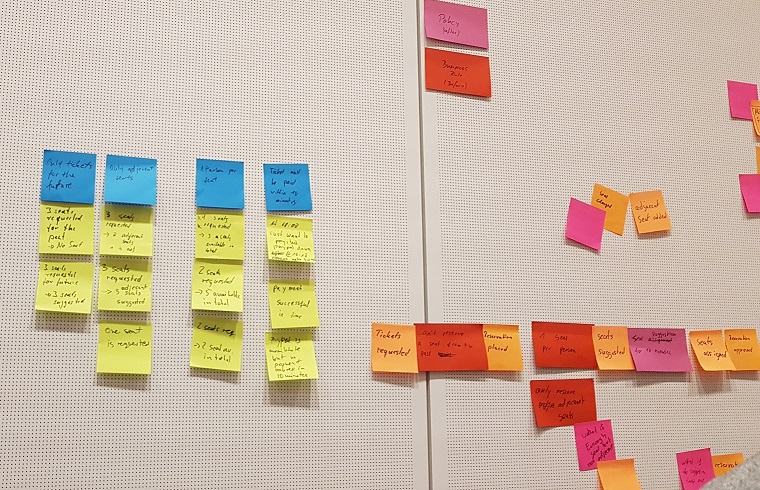
Specifications
Event Storming enhanced with Specifications by Example

We prioritized the rules and policies and for the most important ones we defined examples – just like we are doing it if we discuss a feature and try to find the algorithm.

Example: in our ticket reservation business we had a rule saying “no overbooking, one ticket per seat”. In order to find the algorithm we defined different examples:

  • 4 tickets should be reserved and there are 5 tickets left
  • 4 tickets should be reserved and there are 3 tickets left
  • 4 tickets should be reserved and all tickets are already reserved.

With this last step we can verify if our ideas and assumptions will work out and we can gain even more insights about the business rules and business policies we defined – and all this not as developer writing if-else blocks but together with the other stake holders. At the same time the non-techie people would understand in the future what impact these rules and decisions have on the product we build together. The side-effect having the specifications already defined is also a great benefit as these are the acceptance tests which will be built by the developer and read and used by the product owner.

More about the example and the results can you read on the blog of Kenny Baas-Schwegler.

I hope I covered everything and have succeeded to reproduce the most important learning of the 2 days ( I tend to oversee things thinking “it is obvious”). If not: feel free to ask, I will be happy to answer 🙂

Happy Storming!

Update: we had our first event storming and it was good!

Unfortunately we didn’t get to define the examples (not enough time). Most of the rules described above were accepted really well (explain the rules, create a legend for the stickies, flag everything out of scope as Open Question). Where I as facilitator need more training is by keeping the discussion ON the board and not beside. I have also a few new takeaways:

  • the PO describes his feature and gives answers, but he doesn’t write stickies. The main goal ist to share his vision. This means, he should test us if we understood the same vision. As bonus he should complete his understanding of the feature trough the questions which appear during the storming.
  • one color means one action/meaning. We had policies and processes on the same red stickies and this was misleading.
  • if you have a really complex domain
    (like e-commerce for SaaS products in our case) or really complex features start with one happy path example. Define this example and create the event “stream” with this example. At the end you should still add the other, not so happy-path examples.
You never code alone!

Meine letzte Woche in der Arbeit würde ich gerne the cleverbridge-University-Woche nennen, so großartig war sie. Wir haben 3 von 5 Tagen damit verbracht, unseren Code, unsere Prozesse, unseres Miteinander zu analysieren, zu sezieren, zu verbessern:

  • Dienstag hatten wir fast einen ganz Tag Architektur-Workshop um die Vision und die Strukturen für unseren Code zu definieren.
  • Den Freitag haben wir gemeinsam bei der dotnet-cologne 2014 verbracht.

Das wichtigste hat allerdings am Donnerstag stattgefunden: wir haben uns einen ganz Tag Zeit genommen, um von Ilker, meinem TDD-Mentor, so viel wie möglich über Specs, Tests, Teams und Kommunikation zu verstehen.

Es geht nichts über Verstehen!

from requirement to specifications
Wie schafft es ein Team, das und nur das zu bauen, was der Kunde braucht?

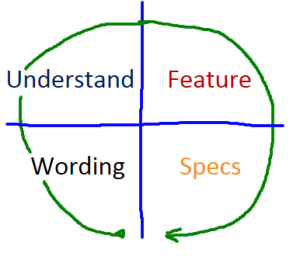
  1. Findet alle zusammen – product owner, Entwickler, Tester – das richtige Wording, die “ubiquitous language” heraus, die die Anforderung beschreiben
  2. Versteht alle zusammen, worum es geht.
  3. Definiert zusammen das Feature
  4. Schreibt zusammen die Akzeptanzkriterien

Wie werden eigentlich eine paar Menschen zu einem Team?

Dies ist wahrscheinlich das Problem aller Firmen weltweit, die sich weiterentwickeln möchten. Und das zu Recht: stell dir vor, du bist ein C#-Entwickler mit zum Beispiel Schwerpunkt Web, hast JavaScript warscheinlich noch nie als Programmiersprache betrachtet und von der Arbeit der anderen C#-Entwickler weißt nichts, außer dass sie existiert und sie irgendwann später erfolgen wird, nachdem du deine Aufgaben schon längst erledigt hast. Einen Abteilungsleiter hast natürlich auch und deine Entscheidungsgewalt beschränkt sich auf “soll ich foreach oder lieber LINQ verwenden?”

Das ist allerdings nicht alles: deine Aufgaben überschreiten niemals die Grenzen deiner Abteilung, genauso wenig wie dein Verständnis über die Anforderungen. Und das stört dich seit langem und nicht nur dich sondern auch den JavaScript-Typen und die Frontend-Entwicklerin und wenn du Glück hast, dann auch deinen Abteilungsleiter. Wenn das der Fall ist, dann hat deine Firma Glück: ihr seid offen für ein Crossfunktionales Team. Ihr musst nur diese Frage bejahen:

Bin ich bereit, jede Rolle in diesem Team zu erfüllen?
Auch mit der Gefahr, dass ich das nicht kann? Wenigstens noch nicht, oder noch nicht gut genug…

Jedes Team braucht noch ein paar Zutaten:

  1. Ein Ziel
  2. Eine Partizipation – eine gemeinsame “Teilhaberschaft”
  3. Den Respekt der Individualität
  4. Die gemeinsame Verantwortung

oder wie Ilker sagt “oder mindestens 3 davon plus jemanden, der die anderen die ganze Zeit daran erinnert”.


Ich will nicht behaupten, dass wir bereits alles darauf haben – aber wir sind auf dem besten Wege dahin. Und was das Wichtigste ist: wir werden diesen Weg sicherlich nicht verlassen.

Kontextabhängige Datenvalidierung

Die Idee stammt von Jimmy Nilsson – Applying Domain-Driven Design and Patterns. Er hat nach einer Möglichkeit gesucht, die immer wiederkehrende Aufgabe, Daten zu validieren, flexibel und kontextabhängig zu gestalten, und zwar so, dass man es nur einmal schreiben muss.

Wie läuft normalerweise so eine Validierung ab? Man will wissen, ob eine Instanz als solche allen Vorschriften entspricht, und wenn nicht, dann welche Felder passen nicht. Jeder, der jemals Webanwendungen geschrieben hat, weiß, wie mühsam und langweilig es ist, jeden Eingabewert auf Gültigkeit zu testen. (Hier geht allerdings nicht unbedingt um Formulare, da kann man ja die Validierung z.B. bei ASP.MVC 2.0 mit Data Annotations durchführen.)

Also zurück zu den Anforderungen: um die verschiedenen Regeln wiederverwendbar zu machen, braucht man diese von einem Interface abzuleiten:

namespace ValidationFramework
{
    public interface IRule
    {
        bool IsValid { get; }
        int IdRule { get; }
        string[] BooleanFieldsThatMustBeTrue { get; }
        string Message { get; }
    }
}

IsValid sagt aus, ob der Regel verletzt wurde. Die IdRule ist dafür da, um diese Regeln einfacher identifizieren zu können. BooleanFieldsThatMustBeTrue kann dafür verwendet werden, um Vorbedingungen zu prüfen. Message braucht wohl keine Erklärung.
Jetzt kann man verschiedene Regeln und eine Basisklasse für gemeinsame Funktionalitäten definieren:

using System.Collections.Generic;
using System.Linq;
using System;

namespace ValidationFramework
{
    public abstract class RuleBase : IRule
    {
        private readonly object m_value;
        private readonly int m_idRule;
        private readonly string[] m_booleanFieldsThatMustBeTrue;
        private readonly object m_holder;

        protected RuleBase(int idRule, string[] fieldsConcerned, string fieldname, object holder)
        {
            m_value = GetPropertyValue(holder, fieldname);
            m_booleanFieldsThatMustBeTrue = fieldsConcerned;
            m_holder = holder;
            m_idRule = idRule;
        }

        private static object GetPropertyValue(object holder, string fieldname)
        {
            return holder.GetType().GetProperty(fieldname).GetValue(holder, null);
        }

        protected object GetValue()
        {
            return m_value;
        }
        protected object GetHolder()
        {
            return m_holder;
        }

        public abstract bool IsValid { get; }
        public int IdRule
        {
            get { return m_idRule; }
        }

        public string[] BooleanFieldsThatMustBeTrue
        {
            get { return m_booleanFieldsThatMustBeTrue; }
        }

        public abstract string Message { get; }

        protected bool BooleanFieldsConcernedAreTrue()
        {
            return
                m_booleanFieldsThatMustBeTrue.Select(a => (bool)m_holder.GetType().GetProperty(a).GetValue(m_holder, null)).
                    Select(b => b).Count() == m_booleanFieldsThatMustBeTrue.Length;
        }
    }

    public class DateIsInRangeRule : RuleBase
    {
        private readonly DateTime m_minDate;
        private readonly DateTime m_maxDate;

        public DateIsInRangeRule(DateTime minDate, DateTime maxDate, int idRule, string fieldName, object holder) : base( idRule, null,fieldName, holder)
        {
            m_minDate = minDate;
            m_maxDate = maxDate;
        }

        public override bool IsValid
        {
            get { 
                var value = (DateTime) GetValue();
                return value >= m_minDate && value <= m_maxDate;
            }
        }

        public override string Message
        {
            get {
                return IsValid
                           ? string.Empty
                           : string.Format("Das Datum ist nicht in gültigen Bereich: {0}-{1}", m_minDate, m_maxDate); }
        }
    }

    public class MaxStringLengthRule : RuleBase
    {
        private readonly int m_maxLength;

        public MaxStringLengthRule(int maxLength, int idRule, string fieldname, object holder) : base(idRule, null, fieldname, holder)
        {
            m_maxLength = maxLength;
        }

        public override bool IsValid
        {
            get { return GetValue().ToString().Length <= m_maxLength; }
        }

        public override string Message
        {
            get {
                return IsValid
                           ? string.Empty
                           : string.Format("Die zugelassene Länge von {0} Zeichen wurde überschritten",m_maxLength); }
        }
    }
}

Jetzt, da die Grundlagen stehen, schauen wir mal, wie man die Validierungsregeln festlegen würde.
Hier ist eine ganz einfache Beispielklasse:

using System;

namespace ValidationFramework
{
    public class Account
    {
        public Account()
        {
            Created = DateTime.Now;
            Address = string.Empty;
        }

        public DateTime Created { set; get; }
        public string Address { get; set; }
        public bool Activated { get; set; }
    }
}

Jetzt definieren wir die Regeln, wonach eine Instanz valide ist oder nicht. Die neue Eigenschaft IsValidated soll diese Information speichern.

    public class Account
    {
        private readonly IList<IRule> m_validationRules = new List<IRule>();

        public Account()
        {
            Created = DateTime.Now;
            Address = string.Empty;
        }

        public DateTime Created { set; get; }
        public string Address { get; set; }
        public bool Activated { get; set; }
        public bool IsValidated { get; set; }

        private void SetupValidationRules()
        {
            m_validationRules.Add(new DateIsInRangeRule(new DateTime(1990,1,1),DateTime.Now,1,"Created",this ));
            m_validationRules.Add(new MaxStringLengthRule(10,2,"Address",this));
        }
    }

Um Regeln auch dynamisch setzen zu können, wird eine Methode AddValidationRule(IRule) definiert

 
    public class Account
    {
...    
        public void AddValidationRule(IRule rule)
        {
            m_validationRules.Add(rule);
        }
...
    }

Nun müssen wir diese Regeln nur noch auswerten. Dafür wird in RuleBase eine statische Methode definiert und in der Beispielklasse die Methode IEnumerable GetBrokenRules()

    public abstract class RuleBase : IRule
    {
...
        public static IEnumerable<IRule> CollectBrokenRules(IList<IRule> rulesToCheck)
        {
            return rulesToCheck.Where(a => !a.IsValid).Select(a => a);
        }
    }
    public class Account
    {
...
        public IEnumerable<IRule> GetBrokenRules()
        {
            SetupValidationRules();
            return RuleBase.CollectBrokenRules(m_validationRules);
        }
...
    }

Um zu beweisen, dass es funktioniert, hier ein Paar Tests:

using System;
using System.Linq;
using NUnit.Framework;

namespace ValidationFramework.Tests
{
    [TestFixture]
    [Category("DateIsInRangeRule")]
    public class If_the_CreationDate_of_the_Account_is_in_range
    {
        [Test]
        public void Then_the_property_Created_is_valid()
        {
            var sut = new Account { Created = DateTime.Now.AddYears(-1) };
            Assert.That(sut.GetBrokenRules().Count(),Is.EqualTo(0));
        }
    }
    [TestFixture]
    [Category("DateIsInRangeRule")]
    public class If_the_CreationDate_of_the_Account_is_to_old
    {
        [Test]
        public void Then_the_property_Created_is_not_valid()
        {
            var sut = new Account { Created = new DateTime(1989,1,1)};
            Assert.That(sut.GetBrokenRules().Count(), Is.EqualTo(1));
            Assert.That(sut.GetBrokenRules().First().IdRule, Is.EqualTo(1));
        }
    }

    [TestFixture]
    [Category("MaxStringLengthRule")]
    public class If_the_Address_of_the_Account_is_to_long
    {
        [Test]
        public void Then_the_property_Address_is_not_valid()
        {
            var sut = new Account { Address = "12345678901"};
            Assert.That(sut.GetBrokenRules().Count(), Is.EqualTo(1));
            Assert.That(sut.GetBrokenRules().First().IdRule,Is.EqualTo(2));
        }
    }
}

Mit den vorhandenen Tests kann man nun refaktorisieren um die Prinzipien der Separation Of Concern einzuhalten. Außerdem ist nun Zeit, auch über die Kontextbezogenheit nachzudenken.
Die Klasse Account wird wahrscheinlich durch irgendeinen ORMapper gefüllt und braucht auf keinem Fall die Verantwortung, die Validierungsregeln zu verwalten. Deshalb kann man das Specification-Pattern von DDD anwenden, und diese Regeln in so eine Spezifikation verschieben:

using System;
using System.Collections.Generic;

namespace ValidationFramework
{
    public interface IValidationSpecification
    {
        IList<IRule> GetValidationRules();
    }

    public class AccountValidationSpecification : IValidationSpecification
    {
        private readonly Account m_objectToValidate;

        public AccountValidationSpecification(object objectToValidate)
        {
            m_objectToValidate = (Account) objectToValidate;
        }

        public IList<IRule> GetValidationRules()
        {
            return new List<IRule>
                       {
                           new DateIsInRangeRule(new DateTime(1990, 1, 1), DateTime.Now, 1, "Created",
                                                 m_objectToValidate),
                           new MaxStringLengthRule(10, 2, "Address", m_objectToValidate)
                       };
        }
    }
}

Die Spezifikationen werden selbstverständlich von einer Factory geliefert und sie werden per Setter Injection gesetzt.

    public  class ValidationSpecificationFactory
    {
        public static IValidationSpecification Create<T>(object objectToValidate)
        {
            if (typeof(T) == typeof(Account))
                return new AccountValidationSpecification(objectToValidate);
            throw new NotSupportedException();
        }
    }
    public class Account
    {
...
        public void SetValidationSpecification(IValidationSpecification specification)
        {
            foreach (IRule rule in specification.GetValidationRules())
                m_validationRules.Add(rule);
        }
...
    }
//Der Aufruf ist dann
var account = new Account();
account.SetValidationSpecification(ValidationSpecificationFactory.Create<Account>(account));

Dadurch ist die Bedingung, Kontextabhängige Validierungsregeln festlegen zu können, erfüllt.

Man kann generische Spezifikationen definieren, die die Regeln für verschiedene Zwecke, z.B. für Persistieren oder auch einfach nur für Akzeptieren definieren:

   
    public interface IValidationSpecification
    {
        IList<IRule> GetValidationRules();
        IList<IRule> GetValidationRulesRegardingPersistence();
    }

Hier der komplette Quellcode zum Herunterladen.